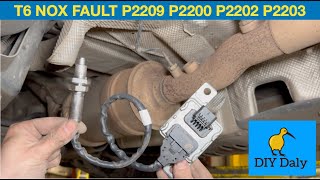
When you see that p2200 code pop up, you're staring at a classic NOx (nitrogen oxide) sensor circuit issue on Bank 1. Let me break it down for you: this sensor is a heavy hitter in your vehicle’s emissions system, especially if you’re running a diesel. Its whole job is to keep tabs on how much nitrogen oxide is passing through your exhaust, so your engine computer can adjust the diesel exhaust fluid (DEF) injection and keep your rig clean and compliant. Now, if you’re driving a Chevy or GMC, you’ll find two NOx sensors-one right after the turbo, the other after the SCR (Selective Catalytic Reduction) setup. Dodge and Ford are pretty similar, but when this code shows up, it’s pointing at that first sensor in the exhaust line. These aren’t your garden-variety oxygen sensors, either-they’ve got their own electronics and a built-in heater, constantly feeding info back to the PCM. If the computer picks up something weird-maybe the signal’s way off, or there’s a communication breakdown because of bad wiring or a dead sensor module-it’s going to throw that P2200 code and light up your dash. Seen it plenty of times, and it always comes down to how well those components are talking to each other.
DTC P2200
Causes of P2200
From my time in the bay and what the service bulletins spell out, these are the big offenders behind a p2200:
- A failed NOx sensor (the sensor’s just done for)
- Wiring to the NOx sensor that’s damaged, chafed, or corroded
- An open or short somewhere in the sensor’s wiring harness
- Loose or rusty connections at the plug or module
- On Chevys and GMCs, sometimes it’s the NOx sensor module itself-usually serviced as a whole with the sensor
Most of the time, you’re dealing with a bum sensor or a wiring hiccup. But don’t rule out water sneaking in or road salt eating away at the connectors-seen that a lot, especially in snowy states. Always start by checking the easy stuff before you start swapping expensive parts.
Symptoms of obd2 code P2200
If your ride’s thrown a P2200, first thing you’ll notice is that check engine light staring you down. Sometimes, you’ll also catch a warning about the emissions system, or even a message about reduced engine power-diesel trucks are especially notorious for this. In my experience, you usually won’t feel a drivability change right away, but leave it too long and the truck can slam you with limp mode or even keep you from starting up after you rack up enough miles. Other signs? Maybe you’ll see your DEF usage spike, or, on rare occasions, the engine might idle rough because the emissions system isn’t doing its job right.

Diagnosis steps for dtc P2200
Here’s how I tackle a sa 16 dtc p220013 when it rolls through the shop:
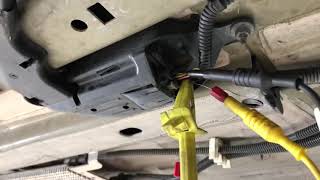
- First thing’s first-visual inspection. Pop the hood and get your eyes (and hands) on the wiring and connectors feeding the Bank 1 NOx sensor (usually the one closest to the engine or turbo). Look for obvious stuff: split wires, loose or dirty plugs, green corrosion, or signs water’s gotten where it shouldn’t. If the sensor’s underneath, don’t forget to slide under and check there too.
- Next up, unplug the connector and look closely for bent pins, pins that have been pushed out, or anything that’s gone green from corrosion. Here’s a pro-tip: have a buddy wiggle the harness while you keep an eye on the sensor data using a scan tool. Intermittent faults can be sneaky.
- If everything looks solid, plug in your scan tool. Check for other codes and see if the sensor’s data is live or flatlined. Readings that make no sense? That’s your smoking gun.
- If you’re still chasing ghosts, break out the multimeter. Check power and ground at the sensor connector, and run continuity tests on the harness. Find an open or a short, and you’ve likely found your culprit.
- If the wiring and power checks pass but the code’s still there, you’re probably looking at a dead sensor. Remember, on some vehicles, the sensor and module come as a set-you’ll need to replace the whole thing.
Don’t skip the basics. Sometimes, a little terminal cleaning is all it takes to bring a system back to life. Save yourself the headache-and your wallet.

Common Mistakes when Addressing the P2200 code
A classic mistake I see: folks yank out the NOx sensor and slap in a new one without ever popping the connector off or checking the wiring. That’s a fast way to throw money out the window if the real villain is a crusty pin or a broken wire. Another misstep? Skipping the scan tool and flying blind. Sometimes, issues are only obvious if you’re watching live data while gently flexing the harness-otherwise, you’ll miss those intermittent faults. Don’t forget: after any repair, clear the code and run a proper drive cycle. That’s how you know you’ve really fixed it.

Seriousness of a P2200 engine code
Take it from someone who’s seen these escalate-don’t let a dtc p220013 sit. You might not feel the pain right away, but give it time and you’ll be dealing with limp mode, or worse, a no-start after enough miles. Running around with a dead NOx sensor can trash your SCR system, clog your DPF, or even mess up your engine control module. I’ve watched small wiring issues turn into big-dollar repairs because someone ignored the warning signs. Don’t risk it-get ahead of it.
Repair Options for obd code P2200
When it comes to fixing these, here’s what works best in my book:
- Patch up or replace any busted wires or sketchy connectors going to the NOx sensor
- Scrub corroded terminals and make sure every connection is tight as a drum
- Swap out the NOx sensor (and the module, if your setup calls for it)
- After any fix, clear the code and run a drive cycle-watch that the code stays gone
One last word of advice-always use OEM sensors. Aftermarket ones might look the part, but I’ve seen them cause all sorts of strange issues or fail to communicate with the computer. Don’t cut corners on this one.
Conclusion
Bottom line: p2200 means your Bank 1 NOx sensor circuit isn’t talking right, and if you don’t handle it, you’re asking for trouble with your emissions system-and your wallet. Treat it as a moderate to high-priority fix. Start by inspecting the wiring and connectors; only move to swapping out the sensor if you’re sure the rest is healthy. Stick to a step-by-step plan and use top-quality parts. Trust me, getting this sorted now saves you a world of hassle down the road.